Creating connected interactive devices with the ESP8266
Introduction
The Internet of Things. It’s a concept that’s captivated the imaginations of people for a number of years now. The idea of having all the things you interact with plugged in to the internet, adapting to the people and environment around them to make our lives that much easier, is a strong idea. But along the way, one can argue that the hype around the idea jumped the gun a bit in terms of feasibility. All that talk about smart cities and homes has not translated into real-world changes as fast as people hoped. At the ETC, our task was to make something in the “Internet of Things” that will interact with the people and environment in a unique way. Being a school for Entertainment Technology, entertainment was obviously the preferred end goal.
The Internet of Things. It’s a concept that’s captivated the imaginations of people for a number of years now. The idea of having all the things you interact with plugged in to the internet, adapting to the people and environment around them to make our lives that much easier, is a strong idea. But along the way, one can argue that the hype around the idea jumped the gun a bit in terms of feasibility. All that talk about smart cities and homes has not translated into real-world changes as fast as people hoped. At the ETC, our task was to make something in the “Internet of Things” that will interact with the people and environment in a unique way. Being a school for Entertainment Technology, entertainment was obviously the preferred end goal.
Concept
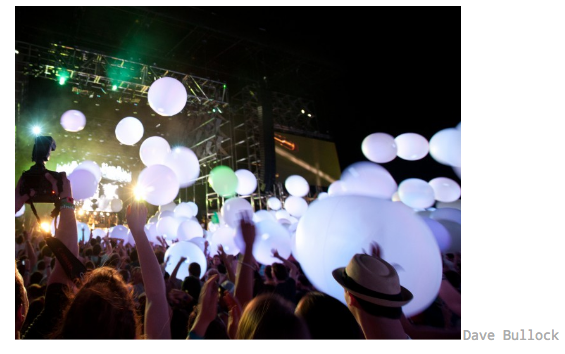
The idea we came up with is a smart, connected beachball. We built a capsule containing a few sensors, microprocessors and lights which can be inserted into special beachballs with sleeves inside them. The balls are able to detect (rough) proximity of other balls around them and can detect when they are being shaken or moved. Further, they exchange all of their sensor data with a central server that can issue color-change commands. This allows the server to orchestrate large-scale “light shows” by syncronizing colors on each ball in a large crowd. They can even be used to play large-scale games and interact with crowds. Since all the logic is run on the server, making new games and applications for this platform is quite simple. One such game idea and implementation will be explained in the end.
Though this tutorial will cover how to build this smart beachball, it is perfectly relevant for just creating connected devices that can communicate with each other and have a common hub of intelligence on the cloud.
Though this tutorial will cover how to build this smart beachball, it is perfectly relevant for just creating connected devices that can communicate with each other and have a common hub of intelligence on the cloud.
Hardware
This section will describe the different hardware components of the system and how to get them all to work.
First, let’s look at a list of all the components that go into the system:
This section will describe the different hardware components of the system and how to get them all to work.
First, let’s look at a list of all the components that go into the system:
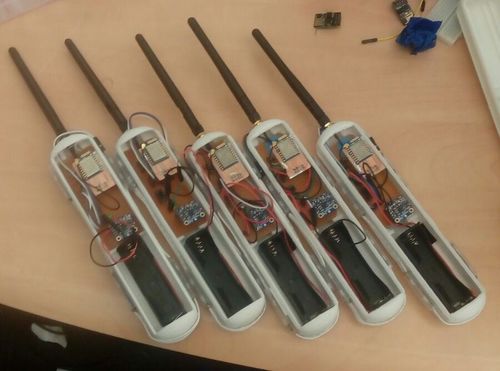
- Primary Board
- Battery
- 3D Printed Shell
- Lights
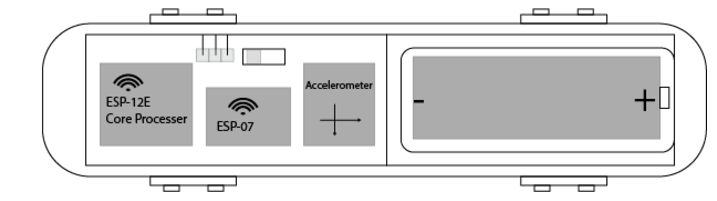
Primary Board
This is a PCB containing the core processor, sensors and connections to the battery and lights. Let’s look at the parts specifically:
This is a PCB containing the core processor, sensors and connections to the battery and lights. Let’s look at the parts specifically:
- Core Processor (ESP-12E)
- Wifi proximity sensor (ESP-01/ESP-07)
- Accelerometer (MMA8451)
- Flip Switch
- LED On-Indicator
- Battery connections
- LED strip connections
- Programming pins
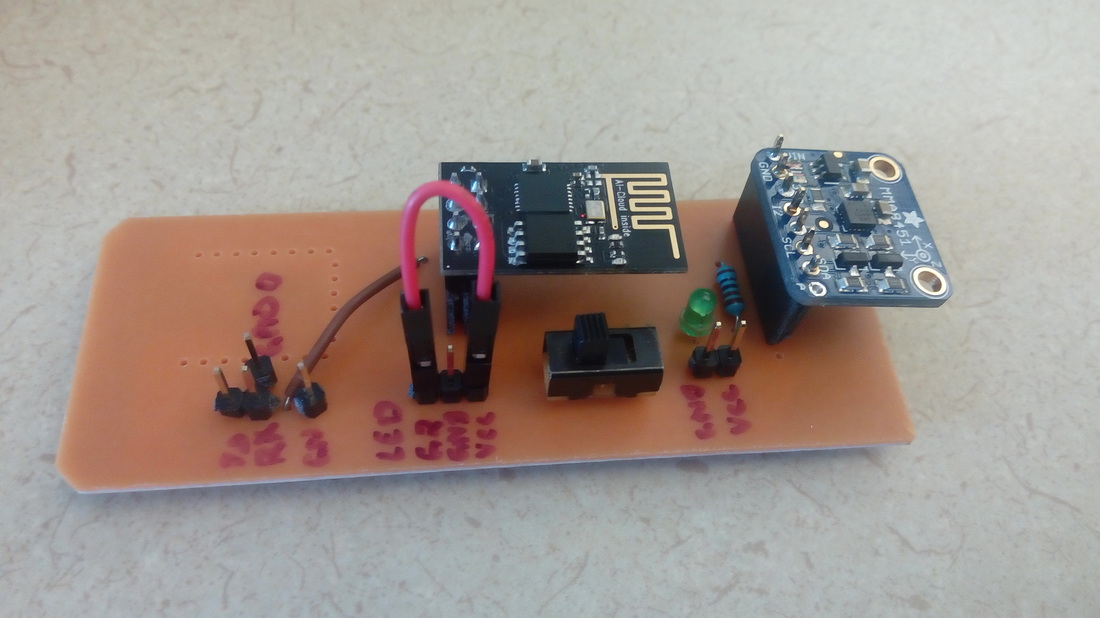
Firstly, let’s look at the ESP8266. This is an amazing little module that has a Wifi antenna and an entire microprocessor inside. The entire package comes as a tiny module for just ~3$! The icing on the cake is that you can use your standard arduino programming framework (Processing) to write code to the module. Very convenient indeed! Here’s a handy tutorial on getting up and running with this module.
you need to make sure all of the electronics are connected to each other and communicating properly. It’s best to connect everything up on a breadboard and get familiar with the connections before building out a PCB design. Check out our articles on connecting each of these parts here:
You can go to the Software section to see how to write the brains behind all of this. Once that is done, come back here to learn about how to make custom PCBs and 3D printed shells to hold all of this.
Once you have all the components connected up and speaking to each other, it’s time to move onto the mechanical bits: PCB etching and 3D printing. Of course, these parts are not essential to the working of the system. However, they go a long way in creating a clean complete module that can take impacts and rough handling.Here is the 3D printing file for our product
you need to make sure all of the electronics are connected to each other and communicating properly. It’s best to connect everything up on a breadboard and get familiar with the connections before building out a PCB design. Check out our articles on connecting each of these parts here:
- Proximity Sensor with Core Processor
- Accelerometer with Core Processor
- LED Strip with Core Processor
You can go to the Software section to see how to write the brains behind all of this. Once that is done, come back here to learn about how to make custom PCBs and 3D printed shells to hold all of this.
Once you have all the components connected up and speaking to each other, it’s time to move onto the mechanical bits: PCB etching and 3D printing. Of course, these parts are not essential to the working of the system. However, they go a long way in creating a clean complete module that can take impacts and rough handling.Here is the 3D printing file for our product
| ballcore_v5.stl |
Software
Once you have all the hardware bits working, you can start programming these guys. An introduction to how to program the ESP was given in the ESP article (Here it is again). To program for wifi proximity detection, check out this article.
Both the core processor and wifi proximity sensor must be individually programmed. Here’s the code to each of these components (attach code bits).
Once the device is programmed, we need to set-up the server to communicate effectively. We use the MQTT protocol for efficient machine-to-machine communication from the device to the server and back. Here’s some more information on the protocol, and how it’s set up for our use case.
Once that is done, we can work on adding applications on top of the system. Here’s an article on that topic. Data collected directly from the sensors are always noisy, so you’ll need to filter out the data to extract the useful information. This is how it can be done.
Finally, here’s an example of one of the games we created, to give you an idea of the sort of things that can be done with this system.
Below you will find all the code that we wrote. Both on the server, and the device.
|
Here is the scanning code (for the proximity scanner)
|
| ||
|
This is the code that goes on the core processor
|
| ||
Extensions
As we were building this system, there were a number of ideas we got super excited about, but just didn’t have the time to implement in our short time-frame. So we just put these down as possible extensions that maybe some of you can take up if you are up for the challenge.
Position Graph
Indoor position tracking is a long-standing problem which is still not convincingly solved. The most promising approaches use a large number of Wifi or Bluetooth ‘Beacons’ placed all over the room which then a device can track and trilaterate to figure out it’s position. If the idea of having a number of wifi hotspots in a room sounds familiar, that’s because that’s exactly what we are doing with the smart beachballs! Every beahcball has a Wifi-hotspot. So it makes sense to use these hotspots to create a position graph of where in space each ball is. This will let you figure out the overall shape of the beachballs, allowing for positional tracking. This will let you do even more interesting things with the balls.
New Applications
The position graph is a very interesting idea, but requires considerable work to improve wifi proximity and then figure out algorithms to create such graphs from noisy proximity data. A much simpler and less technical extension is building new awesome applications on top of this platform. The system is designed to be easy to build new applications on. It uses nodejs scripts and just needs a new script to add new functionality. Do let us know if you create new applications for the system or even if you have any new ideas.
Conclusion
If you were able to get all the parts completed, you have an awesome connected device that can detect proximity with other devices around it, knows when it’s been shaken around, and can react to all of these inputs with lights!
You will have to build a couple of these units to really be able to have fun with them. But the possiblities only really open up when you have dozens of modules like this that maybe can be given to a large crowd at a concert or night show.
This is really just a platform on top of which thousands of different types of applications can be built for crowds to interact and play with each other. The Virus game is only an example of the typed of things that can be done with such a system when well-implemented.
If you do get all the parts connected and running, we’d love to hear the sort of applications you came up with!
